Friday, January 26, 2024

Management of RDP (Remote Desktop) Connections Without a Local Console Installation

Managing RDP Connection Files. 


Managing Remote Desktop Protocol (RDP) connections without the aid of a management console can be a streamlined process if you utilize the features and best practices available through the native RDP client (mstsc.exe). First and foremost, it's important to organize your RDP connections by saving them as individual RDP files with descriptive names. This allows for quick identification and access to different servers or workstations. Secondly, making use of the "Remote Desktop Connection" built-in history feature can help to quickly reconnect to frequently used systems. The native client also allows saving of login credentials securely, which simplifies the connection process by bypassing the login prompt for known connections.

Using Windows RDP Client. 

To manage multiple RDP sessions, users can leverage the "Alt+Tab" shortcut to switch between open remote sessions and their local desktop. Setting the resolution and color depth appropriately in the connection settings can ensure a balance between performance and usability. It's also critical to keep the native RDP client updated as part of the operating system updates to benefit from the latest features and security enhancements. For troubleshooting purposes, understanding the built-in command "mstsc /admin" can grant access to the console session for administrative tasks. Lastly, should a direct RDP connection be infeasible, port forwarding, or VPNs can be used as secure alternatives to access remote systems without additional management software.

Share RDP Connections

Share RDP Connections without managing individual .rdp files. Provide access to most frequently accessed rdp connections of servers and desktop or even less frequently used RDP connections without having to share rdp files and rdp file shortcuts. Use the capabilities and best practices offered by the native Remote Desktop Protocol (RDP) client (mstsc.exe) to ease the process of managing RDP connections without the assistance of a management console. The first and most crucial step in organizing your RDP connections is to save them as distinct RDP files with meaningful names. This makes it possible to quickly identify and access various workstations or servers. Second, using the built-in history feature for "Remote Desktop Connection" can facilitate a speedy reconnect to frequently used systems. By avoiding the login question for established connections, the native client expedites the connection procedure and permits the safe storage of login information.

RDP File Generator - Dynamic file Creation 

RDP Files can be generated dynamically and automatically with a click on a button. The .rdp file is created then downloaded by the web browser with an .rdp extension. The file can then be opened by the locally installed RDPClient such as the default on windows mstsc.exe. 

The native Microsoft RDP client mstsc.exe has screen resizing features. These were not in initial nor earlier versions of the client. With the release of new editions of the rdp client the resizing options have made a tremendous difference. RDP Remote desktop windows can be resized to fit the screen better. This functionality allows for enabling more than one RDP connection session to fit on one desktop.  With autoscaling, full screen rdp sessions resize automatically. This is a huge difference from earlier version of the client which would have scroll bars on the bottom and left side. Bothe Apple iOS and Linux remote desktop clients presumably have these capabilities as well. 

Please comment if you're familiar with any Mac iOS or Linux rdp clients that both use rdp extension files and also have resizing, autoscaling capabilities.  


Wednesday, June 15, 2022

Sync Local AD Object Properties to Azure Manually


Azure AD Sync Service

Sync Local AD Object Properties to Azure Manually


Most small and large businesses have a local domain with domain controllers. When using Microsoft 365 online services, these business will commonly also have an AD Sync server. This server often just a small virtual machine running Azure AD Connect service. 

Azure AD Connect Services Sync

Azure AD connect services sync local change from the local domain to Azure on schedule. The schedule is restricted by Microsoft and the shortest time is 30 minutes. Password changes occur nearly instantly but all other AD object additions or changes to exiting objects take 30 minutes or more. 

Other factors such as local AD replication between domain controllers affects syncing as well. So with sloe local replication the time to sync changes or AD additions to Azure will take even longer depending on the speed of local replication. 

To trigger a local AD replication, logon a domain controller and open an elevated command prompt. this is the fastest way to replicate all domain controllers throughout all sites. This is faster than using the UI. 

At the command prompt enter the following command: 

  C:\>repadmin /syncall /APeD

The command will trigger AD replication though-out the entire domain on all domain controllers.  This an other command can be run remotely. Remote support and software for online Desktop support gives us the capability to access computers and servers remotely for remote control. Some are agent based and others are on-demand. In either case once connected remotely with online computer support software of your choice, you  help the user or administer the server. 

Manual adsyncsynccycle 

Manual AD Sync from local AD to Azure.

The following command I have run very often to trigger replication or syncing from the local domain to Azure. This quick option for manual replication enables faster updates to Azure. it is particularly useful when a new user has been added and you need to continue setting up the user with their desktop and applications. 

Use RDP or another method to access your Azure Sync server and run the following command as shown in the screen capture in this post. that was taken from a real server that was setup and configured to perform Azure AD sync with Microsoft Azure AD connect software.

Run the command in an elevated PoweShell Session. Include the capitalization. 

         C:\>Start-ADSyncSyncCycle -PolicyType Delta 

Be sure to include Delta at the end of the command. There is another option (actually many more) to this command but another that would sync is Initial instead of delta. Please avoid using that option unless you have good reason to because it could cause other issues. Changes are updates lowly sometimes in Azure so expect several to 20 or 30 seconds before you see the changes in Azure. 


Troubleshooting ADSyncSyncCycle AD syncing to Microsoft Entra 

Most common issue with Azure Entra Syncing is the service has stalled for whatever reason. Restart the services associated with Azure / Entra Sync . A reboot of the server is often not required. Be careful to NEVER alter the login ID used for the services. 


Share/Save/Bookmark


.

Wednesday, April 27, 2022

Logoff Console User using N-able System Shell

         Logout Console User using N-able System Shell

Whether the situation you encounter requires is concerning a stuck console session or session that are in disconnected states that need to be manually logged out, there is software that will help and assist. There are tools such as software for online desktop support that work both on the local network and also over the internet.


Attempting logon to server but it is locked. Can't reboot because it's a server and can't be taken down like that. There are active users on the server with open files. Use N-able System Shell to logoff active console session user. 

Just running the command "logoff" at the System Shell window s not enough.

Click System Shell at the top of the take control viewer window, then run the command query session. That will display the current logged on sessions. Take note of the ID number of the user you want to logoff that's a console session.  

Then run the command logoff and the ID number you retrieved. 

    query session

    logoff  {ID#} 


That will logoff the disconnected or connected session and you'll now be able to login to the to the console. This process has worked every time.   The logoff option also works through RDP and also permits logging off RDP connected desktop sessions as well. 

For RDS servers, the same command that queries connection to the server could be used. You will find the list of users logged in will be longer with a busy remote desktop services server. 


We are all used to remotely accessing into systems and servers on the local network using RDP (Remote Desktop Connection) for example. RDP is the default tool for most admins internally. Online access is typically the same and is just a matter of having the user enter a code for security and then there's a connection for screen sharing. 


Share/Save/Bookmark

Enhance your Support Services with Online Desktop Support Software


Tuesday, March 17, 2015

CentOS 6 and Auto Starting Apache httpd at Boot


Setting Apache To Automatically Start on Boot

Recently I had to install 11 Cent OS servers. These servers were to be all identical and were installed using the simple "web server" option during installation time. 
The servers all had Apache 2.0 installed but the service httpd was not set to start automatically with the system. After applying the SSL certificate to all 11 servers, I wanted to test the installation by simply rebooting the servers to be sure the settings took and stuck.  
Setting Apache httpd to start automatically is simple. This also works with Cent OS 5 (outdated but just in case you need to deploy version 5 for some reason it is good to know). 


Setting Apache To Auto-Start on Boot

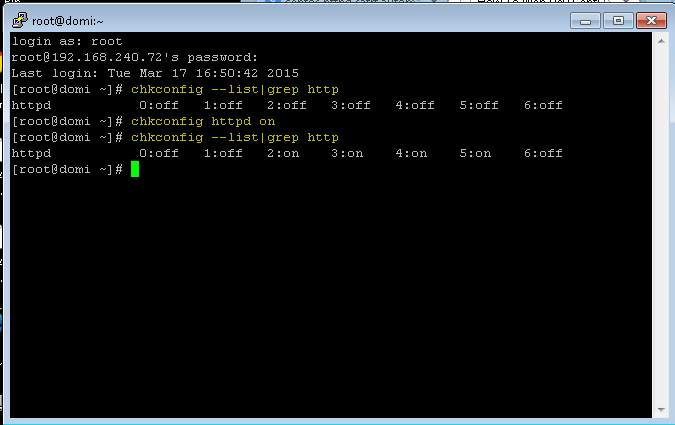
Step 1 – Check to ensure the httpd service (Apache) is installed

[root#] chkconfig --list|grep http

If installed properly, you will see as the output of the command above

[root#] 0:off  1:off  2:off 3:off 4:off 5:off 6:off

Step 2 – Set httpd (Apache) to auto start with the system when re-booted. 


[root#] chkconfig httpd on

Step 3 – Confirm the Apache httpd service is set to auto-start 

Run the same command from Step 1 to see that httpd is set to auto-start
[root#] chkconfig --list|grep http
and will see as the output of the command :
[root#] 0:off  1:off  2:on 3:on 4:on 5:on 6:off

That's it, you're done.  I ran the commands on all servers and they all worked after rebooting. 
Apache httpd started with the system after rebooting. 


Sunday, February 09, 2014

Internet Browser Usage Statistics 2013


Internet Browser Usage Statistics 2013
Major Internet Browsers


Internet Browser Usage Statistics 2013


Chrome has passed Internet Explorer as the Internet browser of choice around the world and that had continued through 2013. Firefox is gaining in usage and some points throughout the year was only points away from Internet Explorer.

When the browser wars began many decades ago, it was not believed that any browser would surpass the might and wide-spread use of IE. Google has done a lot to improve their browser and are working equally as hard to gain traction in the desktop OS arena as well.

Should they commit the resources to an OS as they have done to dominate the browser market we could soon be seeing a new leader in desktop OS deployments.